Science and Technology:

Software engineering, Agile,

UML, MODELING and more . . .

Showing posts with label Tools. Show all posts

Tuesday, November 1, 2011

Automatic requirements numbering


Some time ago I was working for Airbus as Product Leader Deputy.

Among all my duties, I was responsible for writing the high level requirement specification; link it to the stakeholders’ requirements and to the technical specification.

Quality constraints in Airbus are very strict concerning the traceability, the coverage and the impact analysis.

A correct link between all the documents allows us to evaluate the progress of our project, the remaining work and impact of evolutions or bug correction.

Fortunately, there are many tools allowing us to manage these issues.

Reqtify is a very useful software used in order to create, manage and visualize the relationships between artifacts in different documents, in other words, traceability. In a previous post I have explained the "Benefits of requirements traceability"; in that post I describe how to link all the documents into a coherent structure by using a tool called Reqtify.

However, this powerful traceability requires the specification document to be written by following strict naming rules so they can be correctly traced.

Indeed, non-unique or non-homogeneous requirements IDs prevent the traceability software to find a requirement.

Under these circumstances, an automatic numbering tool perfectly prevents human errors.

Such numbering tool shall allow the writer to call it in a very easy and non-intrusive way; i.e. no pop-up or any other kind of external windows.

Airbus provided a MS Word macro called “CARE.dot”. This macro provides an automatic requirement numbering. However, the code of this macro is private, then I decided to create my own macro for requirement numbering.

Word Macro for a Functional requirements template

The configuration of this macro is very simple and its utilization very comfortable.

Hereafter the code explained


Sub AutomaticReqNumbering()
'David GARDUNO
'24/08/2011
'This macro insert automatic requirements number based on document's properties
'Define a doc property "REQ-ID", for example CMPNY-PRJ-REQ-A-
'Define a doc property "REQ-Nmbr", for example 1
'The macro will generate requirement numbers as follows
'CMPNY-PRJ-REQ-A-001-1
'CMPNY-PRJ-REQ-A-003-1
'CMPNY-PRJ-REQ-A-004-1
'CMPNY-PRJ-REQ-A-005-1

'reqnb stores the value of the reqNbrProperty property
Dim reqnb As Integer
'reqID stores the value of the reqIDProperty property
Dim reqID As String
'reqNbrProperty stores the "REQ-Nmbr" document's property
Dim reqNbrProperty  As DocumentProperty
'reqIDProperty stores the "REQ-ID" document's property
Dim reqIDProperty  As DocumentProperty

    'get the "REQ-Nmbr" document's property
    Set reNbrProperty = ActiveDocument.CustomDocumentProperties("REQ-Nmbr")
    ' get the value of the reqNbrProperty property
    reqnb = reqNbrProperty.Value
    'get the value of "REQ-ID" document's property
    reqID = ActiveDocument.CustomDocumentProperties("REQ-ID")

    'go to the beginning of the line
    Selection.HomeKey Unit:=wdLine
    'type the reqID (for example CMPNY-PRJ-REQ-A-)
    Selection.TypeText reqID
    'start typing the ID number
    If reqnb < 10 Then
        'Type one 0
        Selection.TypeText "0"
    End If

    If reqnb < 100 Then
        type a second 0
Selection.TypeText "0"
    End If

    'Type the reference number
    Selection.TypeText reqnb
    'Type the version number
    Selection.TypeText "-1 "

    'Set the last blank space as bold = false
    Selection.Font.Bold = False
    Selection.MoveLeft Unit:=wdCharacter, Count:=1

    'Select the reference number
    Selection.HomeKey Unit:=wdLine, Extend:=wdExtend
    'Set the text as bold
    Selection.Font.Bold = True
    'Go to the begining of the line
    Selection.HomeKey Unit:=wdLine

    'increment the reference document's property
    reqNbrProperty.Value = reqnb + 1


End Sub


Sub AutomaticReferenceNbr()
'David GARDUNO
'24/08/2011
'This macro insert automatic reference number based on document's properties
'Define a doc property "REF-ID", for example CMPNY-PRJ-REF-A-
'Define a doc property "REF-Nmbr", for example 1
'The macro will generate reference numbers as follows
'CMPNY-PRJ-REF-A-001-1
'CMPNY-PRJ-REF-A-003-1
'CMPNY-PRJ-REF-A-004-1
'CMPNY-PRJ-REF-A-005-1

    'refnb stores the value of the refnbProperty property
    Dim refnb As Integer
    'refID stores the value of the refIDProperty property
    Dim refID As String
    'refnbProperty stores the "REF-Nmbr" document's property
    Dim refnbProperty  As DocumentProperty
    'refIDProperty stores the "REF-ID" document's property
    Dim refIDProperty  As DocumentProperty

     'get the "REF-Nmbr" document's property
    Set refnbProperty = ActiveDocument.CustomDocumentProperties("REF-Nmbr")
    ' get the value of the refnbProperty property
    refnb = refnbProperty.Value
    'get the value of "REF-ID" document's property
    refID = ActiveDocument.CustomDocumentProperties("REF-ID")


    'go to the beginning of the line
    Selection.HomeKey Unit:=wdLine
     'type the refID (eg. CMPNY-PRJ-REF-A-)
    Selection.TypeText refID
    'start typing the ID number
    If refnb < 10 Then
        'Type one 0
        Selection.TypeText "0"
    End If

    If refnb < 100 Then
        'Type a second 0
        Selection.TypeText "0"
    End If

    'Type the reference number
    Selection.TypeText refnb
    'Type the version number
    Selection.TypeText "-1 "

    'Set the last blank space as bold = false
    Selection.Font.Bold = False
    Selection.MoveLeft Unit:=wdCharacter, Count:=1

    'Select the reference number
    Selection.HomeKey Unit:=wdLine, Extend:=wdExtend
    'Set the text as bold
    Selection.Font.Bold = True
    'Go to the begining of the line
    Selection.HomeKey Unit:=wdLine

    'increment the reference document's property
    refnbProperty.Value = refnb + 1


End Sub


I have also created a template in the form of a .dot MS-Word file.


The file is named "automatic numbering.dot" . You can download the template in Zip here  or Word format here.


How to add a macro to word 

In order to activate it in Word 2003:
  • Save the attached file
  • Open a word document
  • Menu: Outils > Modèles et compléments (Eng: Tools > Models and complements)
  • Tab "Modèles", click on "Ajouter" (Eng: Tab "Models", click on "Add"
  • Select the .dot file then accept
  • Define a doc properrty "REF-ID", for example "CMPNY-PRJ-REF-A-" (menu Fichier > proprietés > personalisation)(Eng: menu File > properties > personalisation)
  • Define a doc property "REF-Nmbr", for example 1
  • Define a doc property "REQ-ID", for example "CMPNY-PRJ-REQ-A-"
  • Define a doc property "REQ-Nmbr", for example 1

Observe that the .dot added a new menu "Auto Req Number"


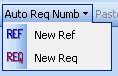
In order to use the macro you need to put the prompt in the line concerning the ne menu, then select the "New req" or "New ref" options in the "Auto Req Number" menu


This macro will generate ID's as follows
  • CMPNY-PRJ-REF-A-001
  • CMPNY-PRJ-REF-A-002
  • CMPNY-PRJ-REF-A-003
  • CMPNY-PRJ-REF-A-004
  • CMPNY-PRJ-REQ-A-001
  • CMPNY-PRJ-REQ-A-002
  • CMPNY-PRJ-REQ-A-003
  • CMPNY-PRJ-REQ-A-004

How to easily access the macro in word

You can also create a shortkey

  • Menu: Outils -> Personalisation ->Commandes (Eng: menu Tools > Personalization > commands)
  • Click on "clavier" (Eng: keyboard)
  • In the window "categories" select "macro"
  • In the window "macros" select one of the numbering macros, for example "req numbering"
  • In the line "enregistrer dans" (Eng: "Save in") select your working document
  • In the line "nouvelle touche de raccourci" (Eng: "New shortkey") type your shortkey, for example Ctrl+shift+Q for requirements and Ctrl+shift+F for references

Observe that the .dot has also added a "Coller comme hyperlien" (Eng: "Paste as hyperlink") button in the toolbar.


This button will allow you to easily create links to your requirements. Fro example, there  are two requirements (007 and 010).

C264CT-BoardsConf-REQ-007 Blah blah blah

C264CT-BoardsConf-REQ-010 Blah blah blah

Now, you want to create a reference to requirement 010 in requirement 007.

  • Copy the entire requirement C264CT-BoardsConf-REQ-010, then go to requirement 007 and type "See ", then click on the button "Paste as a link". Your new requirement will look like

C264CT-BoardsConf-REQ-007 Blah blah blah. See C264CT-BoardsConf-REQ-010

Now, you can navigate within your document: Ctrl+click on the new link


Finally observe that two navigation buttons were also added by the .dot to the toolbar. These buttons allow you to easily go forward and backward your links as in any regular web page.


Enjoy and comment !


***Note. It seams that the “Paste as hyperlink” option is deactivated for some Word versions


Thursday, April 21, 2011

Communicating Systems with UML 2

Modeling and Analysis of Network Protocols


I am very happy to present my book issue of all the work that I have done during my PhD. It deals with the application of a modeling language to a very specific domain: Communication Systems. Some applications of this work can be seen in "Modeling Network Protocols With UML"


David Garduno Barrera, Consultant 

Michel Diaz, LAAS/CNRS, Toulouse, France 

ISBN: 9781848212992 
Publication Date: June 2011   Hardback   320 pp. 
See book description on Editor site: ISTE; John Wiley & Sons

David GARDUNO, PhD. He has worked as consultant for many aeronautical companies such as Airbus and Thalès Avionics. His main duties concerned system modeling and product leading. He has also worked as trainer on system modeling (SysML), Business Process Modeling (BPM), OO Analysis and Design for the European Commission and Astrium, amongst others. He currently works for an intrnational company on electrical systems.

Michel DIAZ, Director of Research at CNRS, editor of twelve books, and 200 publications, Silver Core of IFIP, Senior Member of IEEE, member New York Academy of Sciences, listed in the Who'sWho in Science and Engineering.

Most of the current bibliography on the subject is in the form of scientific papers available in very specialized scientific publications; therefore, they use a complex language and highly technical explanations.

The rest of the literature on the subject is either specialized on teaching UML or on presenting network mechanisms together with the layers of communications protocols.

On the contrary, this book exposes a set of practical examples which can be used either for teaching UML by using protocol examples or for teaching network protocols using UML, leading to a more understandable, and simulation-based approach.

This book gives a practical approach for modeling and analyzing communication protocols using UML 2. It shows how to describe and validate the main protocols issues (as synchronization problems, client-server interactions, layer organization and behavior, etc) in an easy and understandable way. For doing so, the book considers and presents the main traditional network examples (e.g., unidirectional flows, full-duplex communication, error recovering, alternating bit). Finally, it shows the outputs resulting from a few simulations of these UML models.


David GARDUNO

Monday, May 3, 2010

Modeling a Network protocol with UML / SysML


UML is a general purpose modeling language, however there are some areas which are not well explored with this language. Network protocols are a very good example as explained in my book "Communicating Systems With UML 2"

The main tools for network protocol modeling are: Finite State Machines and Petri Networks. A Petri Network for a medium-sized protocol might reach many hundred of states and transitions. These kind of models allow to represent at the same time the communication algorithm and the non deterministic aspect of the subjacent network; however the model might rise incrementally when testing distributed network nodes or when simulating an entire network. Such a model is very hard to create, to analyze, to maintain and to evolve.

UML and SysML are a simple way to model each algorithm, each node and the subjacent network as a different machine.

The following example shows how to use the common diagrams existing in UML and in SysML to represent a very simple network protocol.

The ECHO protocol has the following characteristics:
  1. There are two communicating entities: Client and Server
  2. Client sends one “Hello” message to Server and Server answers with a “Hello_ACK” message
  3. System ends  

Communication Diagram

We can better explain this behavior by using a UML Communication Diagram (this diagram is not available on SysML).


Class diagram / Block Definition Diagram

Then the first step sill be represent each node as a simple class. We can use a Class Diagram (UML) or a Block Definition Diagram (SysML).


Class Diagram: interfaces definition

In a protocol context, we can group the communication messages into groups representing the Sender-Receiver direction. Each set can be represented by an Interface. In this case, we can create two interfaces: Client_2_Server and Server_2_Client. The first interface contains the message Hello_req while the the second interface contains Hello_res.


Class Diagram: ports

The next step is to add a communication port to each node: let’s say P_C (Port_Client) and P_S (Port_Server).
Ports are not very used in the regular software models with UML; however, SysML uses this concept in a more extended way since it defines Standard Ports, Flow Ports and Item Ports..


Required and Provided interfaces

Now, let us associate the previously created interfaces to the Client and the Server classes.
From the point of view of the Client, the Server_2_Client interface is “provided” since it represents the messages that the Client can receive. In the protocols context, the “provided” interface is seen as the input messages set.
In the same way, from the point of view of the Client, the Client_2_Server interface is “required” since it represents the set of messages that the Client asks its communication partners to provide. In the protocols context, the “required” interfaces are seen as the output messages set.
Note that this is the port which is linked to the interfaces. Indeed, in the protocols context, the nodes receive and send messages through the ports, then these are the ports which should be linked to the interfaces:
  *  Realization = required interface
  *  Dependency = provided interface


It is also possible to represent the interfaces in a different way:


Composite Structure Diagram / Internal Block Diagram

Finally, we can connect the nodes through a Channel or Connector by using a Composite Structure Diagram (UML) or an Internal Block Diagram (SysML)


At this point, we have performed the structural modeling of the ECHO protocol. Now, let’s create the behavioral modeling.
First, let’s represent the expected exchange of message between the Client and the Server in a chronological order. For this, we can use a  Sequence Diagram (UML and SysML).


State Machine Diagram

The next step consist in representing the behavior of each node in order to reproduce the expected exchange of messages. For this, we can use an Activity Diagram (UML and SysML) or a State Machine Diagram (UML and SysML). Lets see the Activity Diagram for the Client node:


Activity Diagram

And now the Activity Diagram for the Server node:


Validating and Simulating the model

At this point we have all the elements allowing to represent a simple communication protocol.
The next step, which is, in my opinion, the most important of all, consist in validating and simulating the model. Indeed, in a simple example, as the one that I have represented here, it is not necessary to simulate since it is easy to verify that the proposed Activity Diagrams will effectively produce the expected sequence of messages. On the contrary, for a complex diagram, the validation and simulation of the model will allow to verify:
  1. That all the states have been visited. This way, we can ensure that the is no ‘unexpected’ behavior.
  2. That all the transitions have been fired. This way we can verify that there are no problems such as: Starvation or Dead locks.
  3. That the combined behaviors effectively produce the expected exchange of messages in a chronological order
However, at this moment, I have no license of any of the software programs allowing this kind of simulation.
If somebody know a free program for simulating an Activity Diagram or a State machine, I’ll be glad to know it and to taste it.

Further reading in protocols modeling and simulation

You can see some of my works on protocols modeling in French version, in English version, or as a Slideshow .

David GARDUNO

Wednesday, March 3, 2010

Installing Richnesse on Fitnesse


RichNesse is a WYSIWYG text editor for Fitnesse. It is based on FCKEditor. The last version of Richnesse was released on 2008-06-03; while the current version of Fitnesse was released on 2010-01-03. Richnesse is no more compatible with Fitnesse since version 2009-03-21 (more or less).
Nevertheless, it is possible to make them Work together. The instructions are as follow:


  1. Download and install the Fitnesse .JAR (I'm currently using the 20100103 version) file
    • You should have a folder with the fitnesse.jar file and a FitNesseRoot folder
    • The server should now be up at the end of the installation process. If so, then stop it by going to the following url: http://localhost/?responder=shutdown
  1. Download the Richnesse Zip file (I'm currently using the 0.804 version from 2008-06-03) and unzip it into the same folder as Fitnesse
    • You should obtain the following files beside the fitnesse.jar one:
      • RichNesse.jar
      • RichNesse.plugins.properties
  1. The next step is to set the properties file
    • Rename the RichNesse.plugins.properties file as plugins.properties
  1. At this point I got a problem: It was impossible to configure the classpath in order to point to the RichNesse.jar file. Then, I had to relocate the Richnesse files inside the Fitnesse jar file.
    • Open the RichNesse.jar file (try using winzip, for example)
    • extract the RichNesse folder
    • Open the fitnesse.jar file (try using winzip, for example)
    • Add the RichNesse folder that you have just extracted into the fitnesse.jar file
  1. Richnesse requires a 'responder' class which is not available any more in the recent versions of fitnesse (since 2009). It also requires an old version of a 'recorder' class. Lets get them:
    • Download the fitnesse zip folder version 2009-03-21
    • unzip this file into a temporal folder
    • Open the old fitnesse.jar file (try using winzip, for example)
    • Extract the SecureResponder.class file from fitnesse\responders\
    • Extract the SaveRecorder.class file from fitnesse\components\
  1. Lets integrate the old files into the new version of FitNesse
    • Open the recent fitnesse.jar file (try using winzip, for example)
    • Take the SecureResponder.class file you have extracted from the old fitnesse version and add it into fitnesse\responders\
    • Take the SaveRecorder.class file you have extracted from the old fitnesse version and add it into fitnesse\components\
    • Close the fitnesse.jar file

You can now launch the fitnesse server and access it in http://localhost/. The RichNesse button should now be available on the left panel.

The problem is that, when you install Richnesse this way, the standard 'Edit' button doesn't work any more. Moreover, if you click on this 'Edit' button, there will be a call to the server, the server will not respond to this call and the client will remain waiting for the answer. I think that the server is then altered and the following request will not longer succeed. The solution is then to shut-down and then up the Fitnesse server.

One more comment. I think that, when the Richnesse plugin is installed, then the reports created when there's a problem with the fixtures are less accurate.

Do you have another solution for installing a WYSIWYG editor for Fitnesse?

D. GARDUNO

Wednesday, February 25, 2009

Benefits of requirements traceability


“The hardest single part of building a software system is deciding precisely what to build.
No other part of the conceptual work is as difficult as establishing the detailed technical requirements, including all interfaces to people, to machines, and to other software systems.
No other part of the work so cripples the resulting system if done wrong. No other part is more difficult to rectify later.”

Frederick P. Brooks Jr. in “No Silver Bullet: Essence and Accidents of Software Engineering.”

Bad foundations guarantee the instability of the entire building. Nevertheless The opposite is not always true. In order to have a stable building, the existence of good foundations is mandatory, but it’s not enough.

This premise is applicable to other domains than construction. In software engineering, the Software Requirement Specification (SRS) is the foundation of the entire system.

Writing a good SRS is mandatory in order to correctly start constructing stable software. However, the SRS is one of the more instable parts of software.


The number of modifications to the SRS grows very fast; we can say that 30% of requirements are modified in a midsize project.

“Changing requirements is as certain as death and taxes”

Daniel Amyot; Lecture in Software Engineering; Ottawa University

This presentation gives a brief description of the problem, then it remark the consequences and gives some advices in order to correctly write and trace requirements. Finally, it gives some examples of traceability by using the Reqtify tool.

This powerful traceability requires the specification document to be written by following strict naming rules so they can be correctly traced. In another post I give the code of a tool allowing you to add an "Automatic requirements numbering" to your Software Requirement Specifications.


Take a look to this presentation named Benefits of requirements traceability by David Garduno
D. GARDUNO